

|
Creating a New Outline
• Basic Outline The default outline type is a “Basic Outline”. This outline will be pre-configured with only the “item” text displayed. (All other fields are always included in the raw data and can be accessed via the detail editor or displayed by manually changing which fields are displayed.) This style of outline is well suited to outlining books or presentations or other cases where additional features are not needed. • Simple Check List Changing the outline type to “Simple Check List” will generate an outline pre-configured to also display a checkbox field. It will also be configured to “roll up”, or aggregate, completion status. (With aggregation enabled, a parent will automatically be marked complete when all of its children are marked complete.) This style of outline is well suited to task lists and other activities where you want to be able to “check off” items as you complete them. • Simple To Do List Changing the outline type to “Simple ToDo List” will generate an outline pre-configured to display both a checkbox field and a due date field. This style of outline is intended for cases where you need to track a due date. • Further Customization Regardless of which outline type you select to create a new outline, the raw data stored in the outline includes all of these fields (and more). At any time you can reconfigure which fields are displayed through the Outline Settings->View Configuration menu option within the outline. View configuration (as well as all other items configured on the Outline Settings menu) is maintained per-outline, so each outline can have its own configuration. See the topic on Outline Settings for more information. Opening an Existing Outline To open an existing outline, simply tap the name of the outline in the list. The outline will be opened in the Outline Editor. Renaming an Outline To rename an existing outline, long-press on the name of the outline until it selects. The outline will be highlighted, and new commands will become visible on the Action Bar at the top of the screen. Tap the Deleting an Outline To delete an existing outline, long-press on the name of the outline until it selects. The outline will be highlighted, and new commands will become visible on the Action Bar at the top of the screen. Tap the Duplicating an Outline To duplicate an existing outline, long-press on the name of the outline until it selects. The outline will be highlighted, and new commands will become visible on the Action Bar at the top of the screen. Tap the Creating a New Outline from a Template You can also create a new empty outline using an existing outline as a template. This is useful if you have a complex outline with customized view configuration, category definitions, or other outline settings that differ from one of the standard types available in the New Outline dialog.
To create a new empty outline from a template, long-press on the name of the existing outline until it selects. The outline will be highlighted, and new commands will become visible on the Action Bar at the top of the screen. Tap the Emailing an Outline (Pro Version) • Sending an Outline To send an outline via email, long-press on the name of the outline until it selects. The outline will be highlighted, and new commands will become visible on the Action Bar at the top of the screen. Tap the • Receiving an Outline When you receive an email with an attachment with a .gpvn extension, in most cases you can tap the attachment and a selection dialog will open allowing you to select which application you want to open the file. Select the Grapevine application. The file will be imported into the database and Grapevine will open the file. (If an outline by the name of the attachment already exists, you will be prompted for a new name for the outline. The import function will not allow you to overwrite an existing outline. If you intend for the imported outline to replace an existing outline, you should delete the old outline first.) There appear to be some email clients that do not handle attachments in a robust way and don’t know what to do with the .gpvn extension. In those cases, you should be able to save the file, then locate it using a file browser (like Astro File Manager) and “open” it from that application (which will cause it to be imported into Grapevine). Importing an Outline (Pro Version) If you are migrating from Bonsai or SplashNotes, you can import existing outlines. • Bonsai To import a Bonsai outline, first export the outline from Bonsai in CSV (comma-separated values) format. Then copy the CSV file into the “Grapevine/Import” folder on your Android device. (This folder is automatically created in the default external storage directory (usually /sdcard) the first time the Grapevine app runs.) • SplashNotes To import a SplashNotes outline, just copy the *.sno file into the “Grapevine/Import” folder on your Android device. (This folder is automatically created in the default external storage directory (usually /sdcard) the first time the Grapevine app runs.) Exporting an Outline (Pro Version) To export an outline (or a group of outlines), long-press on the outline you want to export in the outline list. (If you want to export multiple outlines, tap each additional outline to select it after the long-press to select the first.) Then tap the overflow menu icon |
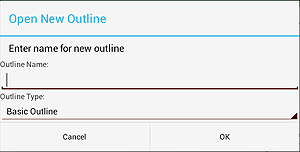 To create a new outline, tap the